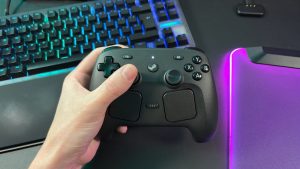
I’ve been using the new Steam Controller for a couple of weeks now and over that time I’ve taken it apart a total of three times. Each time, piece by piece, back to an empty shell. That might sound like a waste of time, but disassembling the Steam Controller only takes around 15 minutes once you know what you’re doing.
Valve has designed the inside of the Steam Controller like it was waiting for someone to rip it open. Held together by easily accessible screws, it contains clearly labelled components that, for the most part, could be replaced or repaired at home.
There are a couple parts that may require a little more know-how with a soldering iron, such as the TMR sticks. But Valve has told me it will be making spare parts officially available via iFixit, as it does today for the Steam Deck. That won’t happen right away but sometime in the future. Once that happens, we’re onto a winner for repairability.
Here’s what you need to disassemble the Steam Controller:
Torx T6 screwdriverTorx T5 screwdriver (only for trackpads/trackpad PCB)
Here’s what’s nice to have:
Pair of tweezersSpudger
Steam Controller – Teardown
During my first couple of days with the Steam Controller, I noticed one of the triggers was a little louder than the other. Only a barely noticeable metallic ping as the trigger reset, but enough for me to take a look inside and see if there was something up.
There are seven Torx screws between me and the inside of the Steam Controller. These require a Torx T6 bit. With those taken care of, the rear shell comes cleanly away.
FutureFutureFuture
First off, the squeaky trigger. The trigger mechanism is a simple spring attached beneath the trigger itself, which is sat on a metal bar running through a couple of plastic struts. It’s a Hall effect trigger with corresponding sensors on each side of the mainboard.
(Image credit: Future)
Looking to the squeaky left trigger, there’s not much different to the right. The spring is perhaps at a slight angle compared to the other side, so I prod at it a little, and, voila! The squeak is gone. Simple as.
FutureFutureFuture
Diving further in, the battery can be lifted out with just a finger from the right side. The contacts are on the left side but are only held in place by the housing. So, in the event of needing a replacement, this would require nothing more than a single Torx screwdriver and a replacement battery.
(Image credit: Future)
The battery is a Li-Ion made by Getac Technology (Kunshan) Co., Ltd and rated to 2,178 mAh and 8.39 Wh.
Removing the battery housing requires unscrewing another four Torx T6 screws, of a shorter length than those holding the outer shell together. Before doing that, however, I remove the two cables that connect the haptic motors in the grips to the mainboard.
The now exposed mainboard has another three Torx T6 screws holding it in place.
FutureFuture
It also has a ribbon cable to the PCB for the trackpads, which needs to be removed. The mainboard has a Nordic Semiconductor SOC mounted in the middle, which appears to be a Nordic Semiconductor SoC with Bluetooth and 2.4 GHz (nRF52833).
(Image credit: Future)
Upon removing the mainboard, I could see that the TMR thumbsticks are soldered onto the other side of it. That means if a thumbstick were to break, you would need to replace the entire mainboard. Unless you felt comfortable with a soldering iron, of course, in which case it shouldn’t be too bad to replace.
The soldered thumbsticks make a change from the Steam Deck, which had its mounted to individual PCBs and made swapping to different thumbsticks an easy job.
FutureFutureFutureFuture
You can see from the mainboard that it was manufactured in either September or December. It does seem likely that it’s using an international date format and therefore was manufactured in September, which would mean Valve has been piecing these together for a long time. Perhaps a positive sign for widespread availability at launch?
I was unsure where to go next at this point. There’s still a board for the trackpads that needs removing, but I can’t reach it until I’ve removed the haptic motors on either side. These appear to be held onto a singular plastic plate that connects both sides of the controller.
I can reach most of the screws holding the plastic frame in place, except for two hidden behind the triggers. For now, I am able to remove a large ribbon cable for the face buttons that rests in place on two small plastic clips at the centre of the controller.
(Image credit: Future)
I then realise I only need to remove the metal bar that the triggers are attached to in order to remove them entirely. With those gone, I can finally see under the trigger and apply a drop of lube to the struts holding it in place. And get at the two remaining screws holding the plastic frame.
FutureFuture
With the plastic frame gone, the haptic motors, shoulder buttons, and face button membrane all go with it. It’s now possible to remove or replace the buttons and rubber gaskets they rest on.
FutureFutureFutureFuture
The trackpad PCB has a few more ribbon cables that need to be unhooked and removed, so away those go. Then I can remove four more screws to pull away the PCB itself. This is the first time I need to change my driver bit, switching to a Torx T5.
The screws used here are slightly shorter, so better not mix them up.
FutureFuture
There’s not much to this trackpad board, beyond a Cirque ASIC for controlling the two modules that rest underneath it.
FutureFutureFuture
With that removed, it’s onto the final piece of the puzzle: the trackpad modules themselves. With these removed through four screws on each side, the entire controller is in pieces on my desk.
Verdict
I’m impressed. Valve has shown it cares about repairability in the past and that holds true for the Steam Controller.
Admittedly, I first opened it up to try to solve an issue that shouldn’t have been there in the first place—the squeaky trigger—but not only was that resolved easily, the repairability of the Steam Controller was laid bare while doing so.
Many parts of the Steam Controller should be an easy replacement with minimal fuss, especially once spare parts are available to purchase.
It’s only the thumbsticks that are more likely to require a full repair job, on account of being soldered to the mainboard itself. That’s not unusual for a controller and not impossible to do with a soldering iron at home. Though being tunnel magnetoresistance (TMR) sticks, I’m hoping for a long shelf life and minimal stick drift as these are some of the intended benefits over potentiometer.
For now, it’s time to put it back together. Make sure to tighten everything down when you’re rebuilding, especially the trackpads, as you may end up with a rattle if you don’t—don’t ask me how I know that.